

Overview
The Shopify Connector is a data integration feature within Clever AI that links your Shopify store to the Hello Clever platform. Once connected, Clever AI can read your store’s data and provide intelligent insights, analytics, and answers to your business questions through the AI-powered chatbot. This guide walks you through the end-to-end setup process: creating the connector app, generating the required credentials in Shopify, entering them in Clever AI, and using the chatbot once your data has synced.Do you need to connect Shopify first?If your transactions already flow through the Hello Clever payment gateway, you can use Clever AI immediately without connecting Shopify.The Shopify Connector is an additional feature used when you want Clever AI to enrich its response with store-specific data (orders, customers, inventory) beyond payment transaction insights.
Prerequisites
Before you begin, make sure you have the following:- An active Shopify store with admin access
- A Hello Clever merchant account with access to Clever AI
- Permissions to create and install custom apps in your Shopify store’s developer portal
How it works
The Shopify Connector uses Shopify’s secure API system to grant Clever AI read-only access to specific areas of your store’s data. Here is the flow: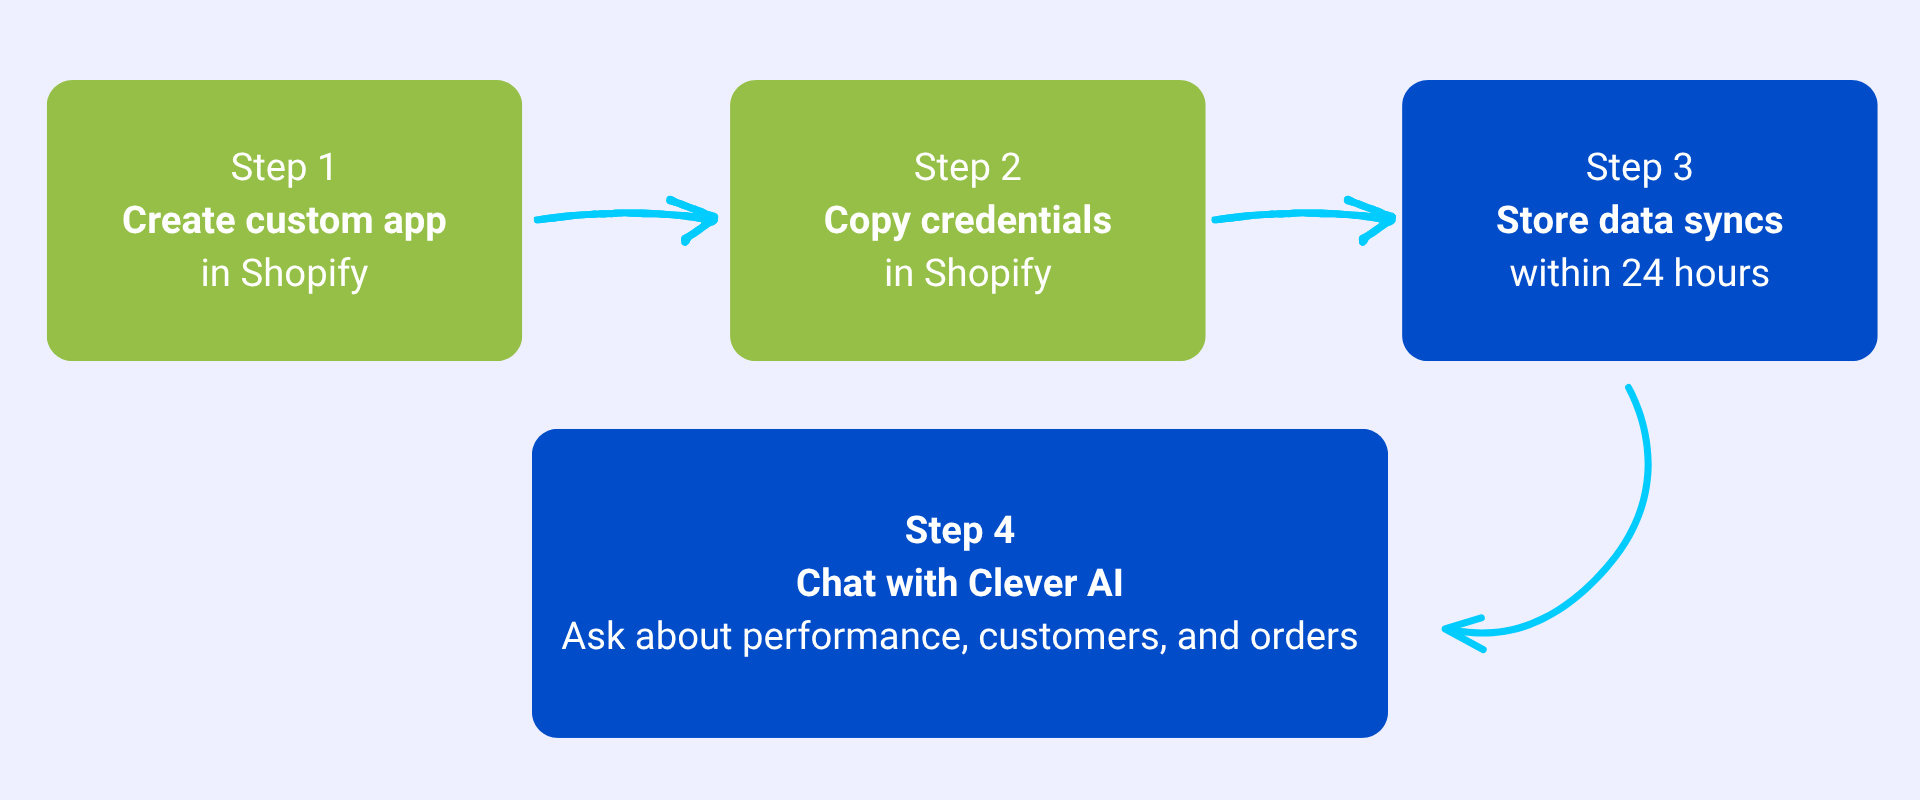
- You create a custom app in Shopify and select which data scopes Clever AI may read.
- You copy the API credentials from Shopify and paste them into Clever AI connector settings.
- Clever AI syncs your store data within 24 hours.
- Once synced, you can chat with Clever AI about your store’s performance, customers, and orders.
Read-only accessClever AI only reads your Shopify data. It does not write to, or delete anything in your store. Access is strictly limited to the scopes you explicitly select during setup.
Data scopes
When setting up the Shopify Connector app, you will be asked to grant access to specific data scopes. Clever AI currently supports nine scopes, all related to the financial and operational aspects of your store. The following table describes each scope.Step-by-step guide
Using the Shopify Connector requires four (4) parts:- Create a custom connector app in Shopify.
- Install the custom connector app to your store.
- Add the custom connector app in Clever AI.
- Start using Clever AI to query your store data.
Part 1 - Create a custom connector app in Shopify.
- Log in to your Shopify Admin dashboard at https://admin.shopify.com.
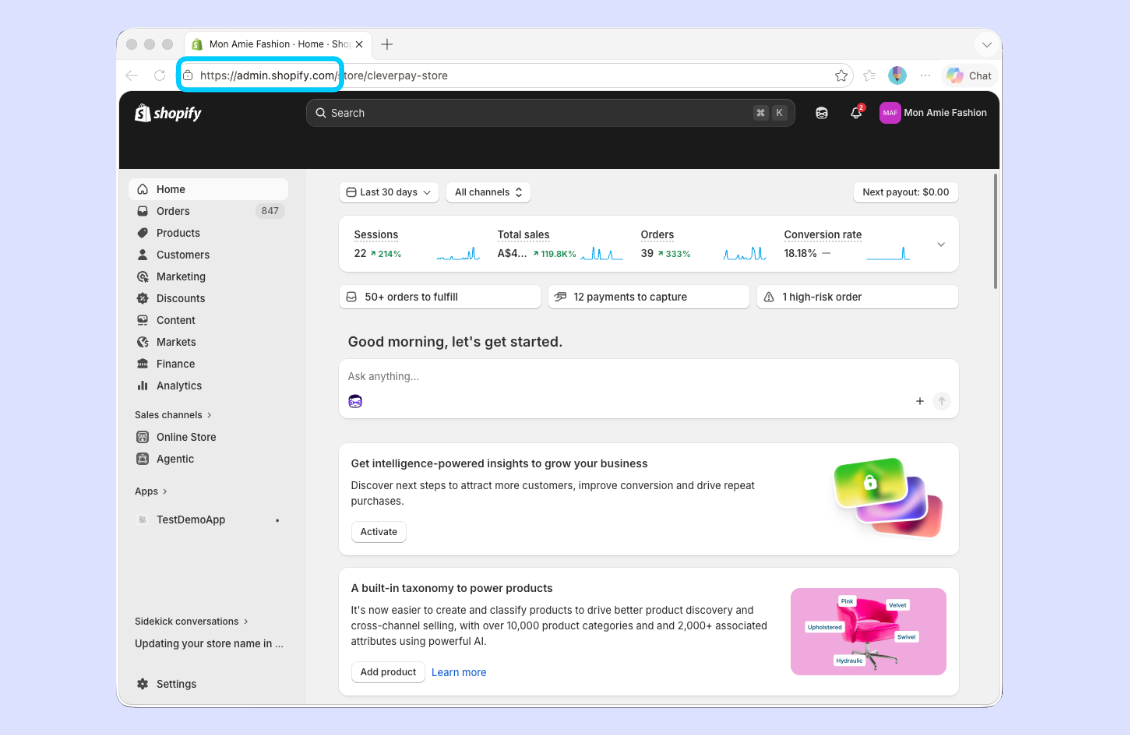
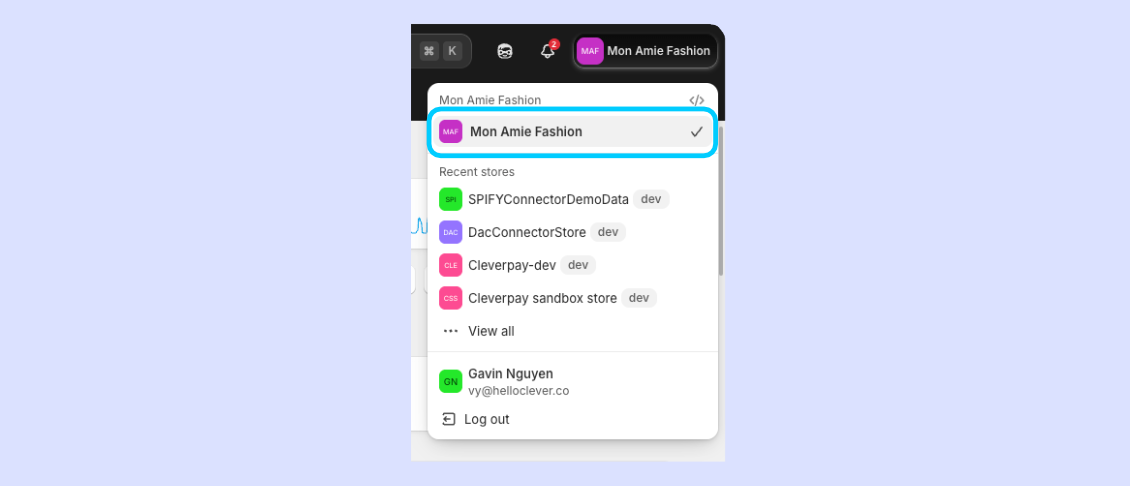
- On the upper right-hand portion of the dashboard select the name of your store to connect to Clever AI. This is an important step if you have several stores you manage under your account.
- At the bottom of the left-hand navigation, click Settings, then select Apps. This opens the Apps list. Select the Develop apps button. The App development panel opens.
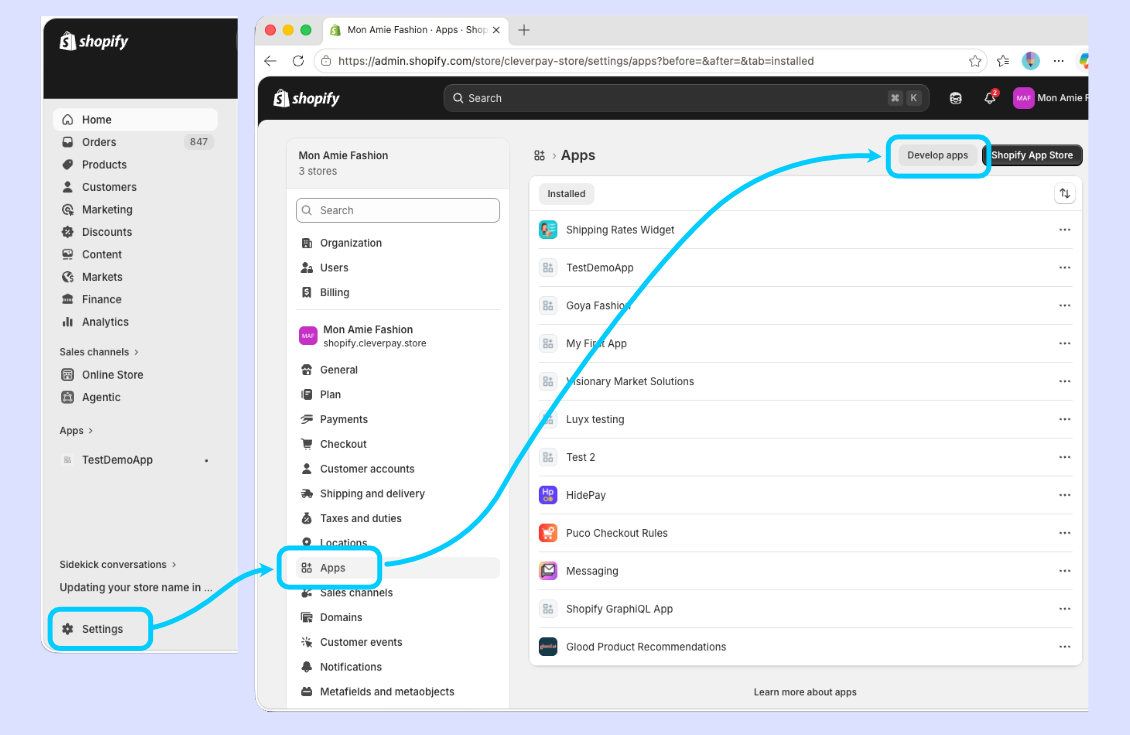
- Select Build apps in Dev Dashboard button. This opens the Dev dashboard.
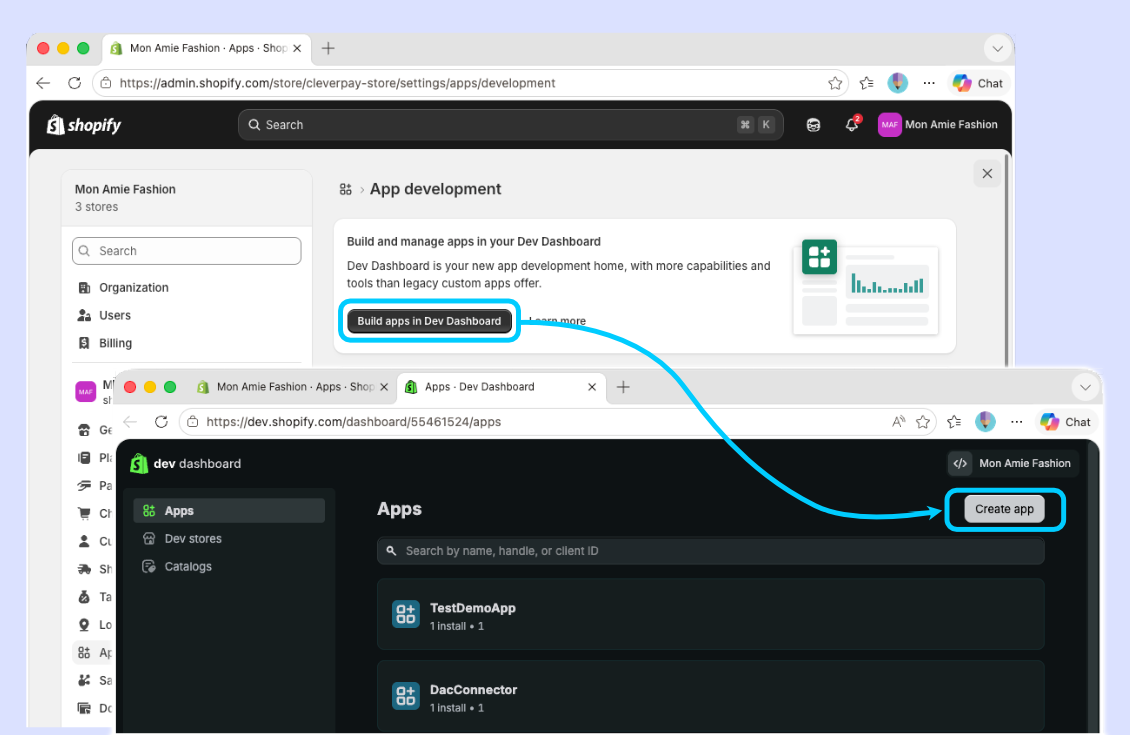
- Select Create app. This opens the Create an app panel. Give your app a descriptive name (for example, “Clever AI Connector”).
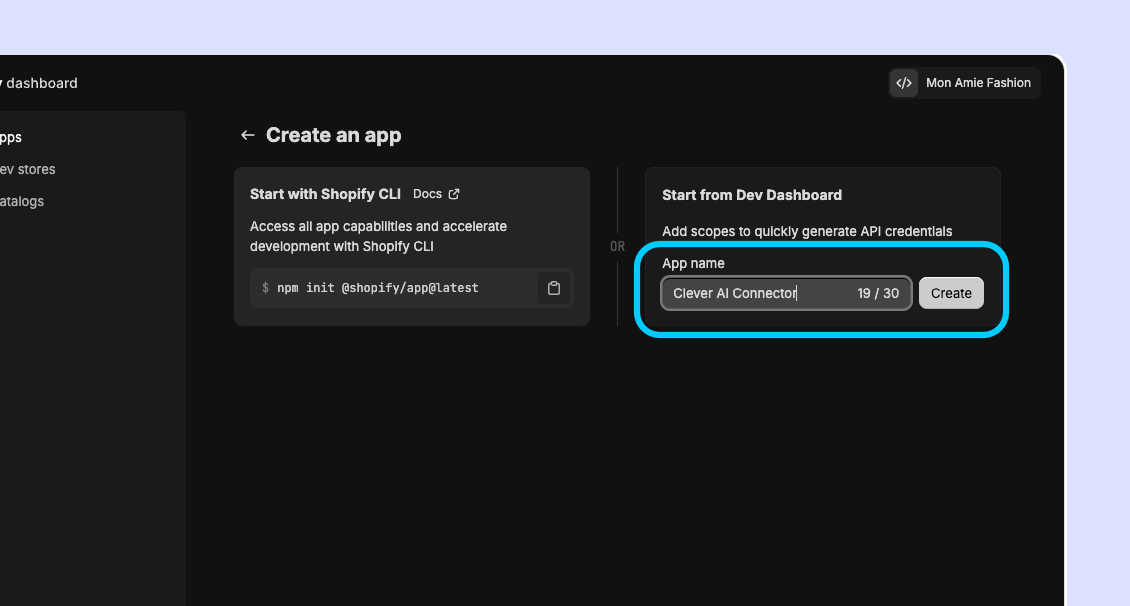
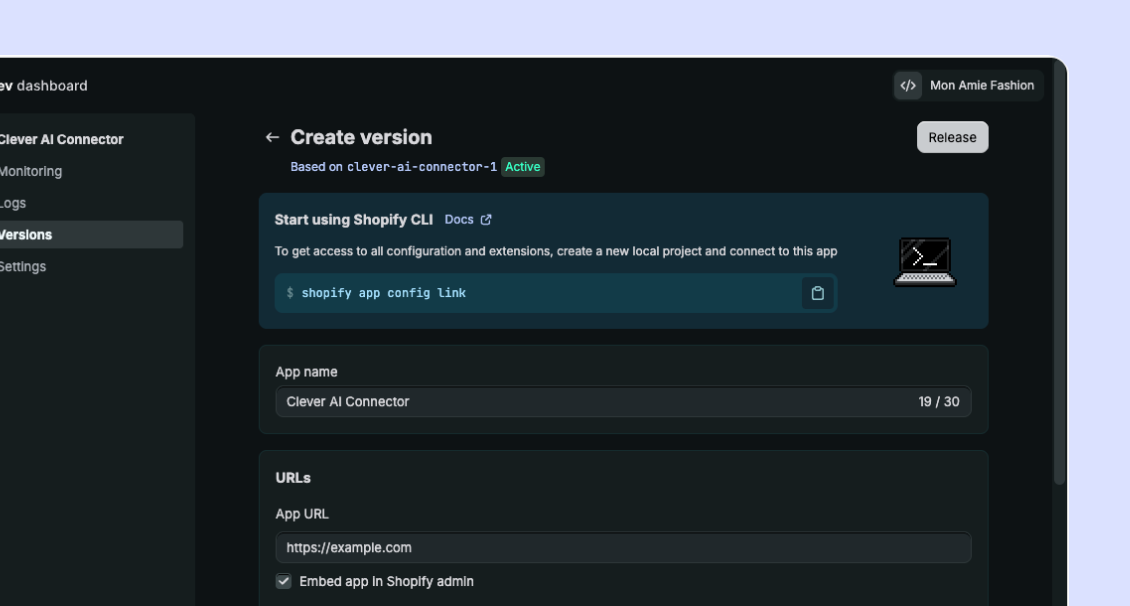
- Once the app is created, the Create version panel opens. Here you can add additional information about the app. For this guide we will just focus on the scopes.
- Scroll down to the Access > Scopes section and select Select scopes.
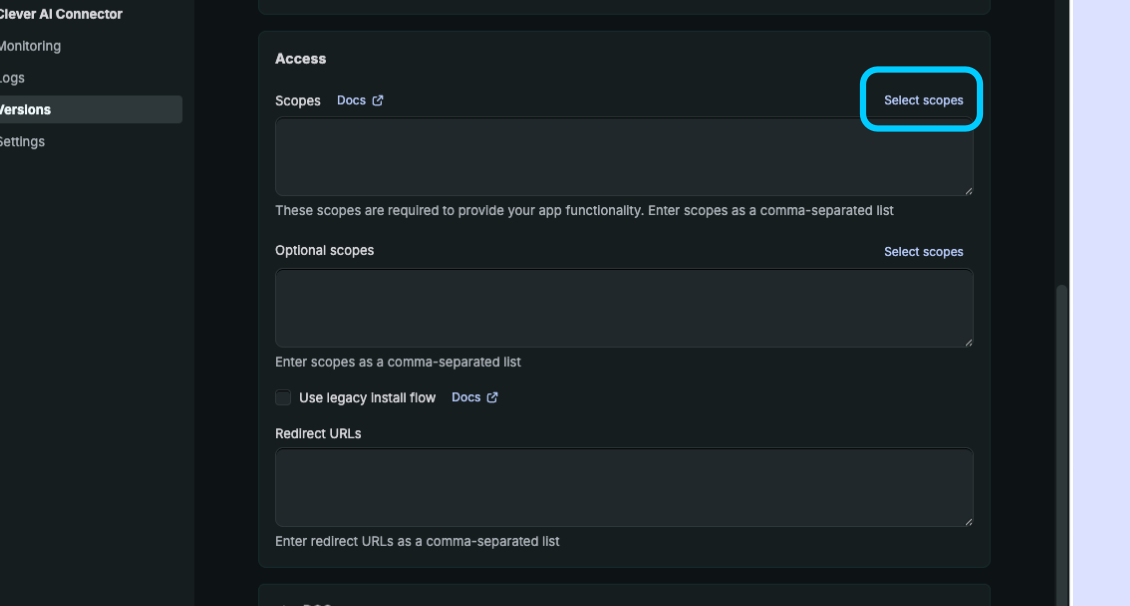
- Scroll through the list of API access scopes. Select the read permissions relevant to your needs. Refer to the Data scopes table above for guidance. Only select
read_scopes; do not grant write access. Select Done when finished.
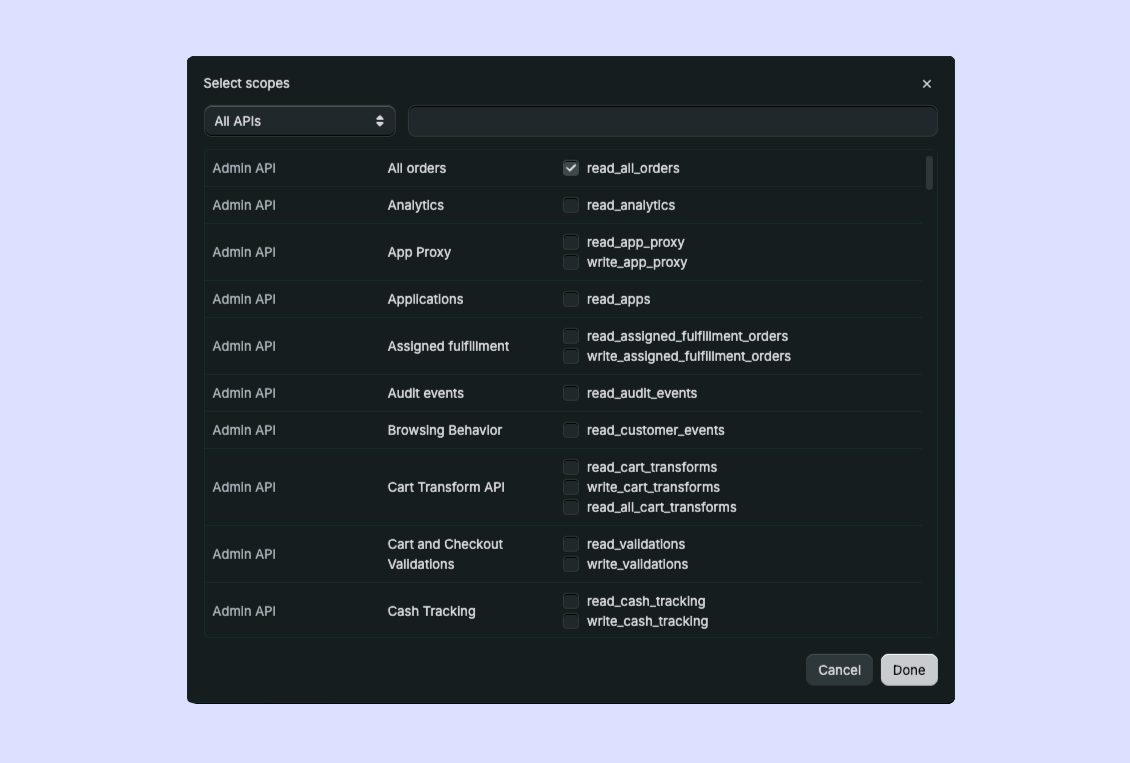 For your convenience, you can copy the following code and paste it in the Scope text field:
read_customers,read_orders,read_all_orders,read_products,read_shopify_payments_payouts,read_shopify_payments_disputes,read_price_rules,read_returns,read_payment_terms
Requesting access to scopesSome of Shopify’s pre-defined scopes are protected and require you to request access to them. If you encounter such a scenario, go to the Access > Scopes section and select the Request access link.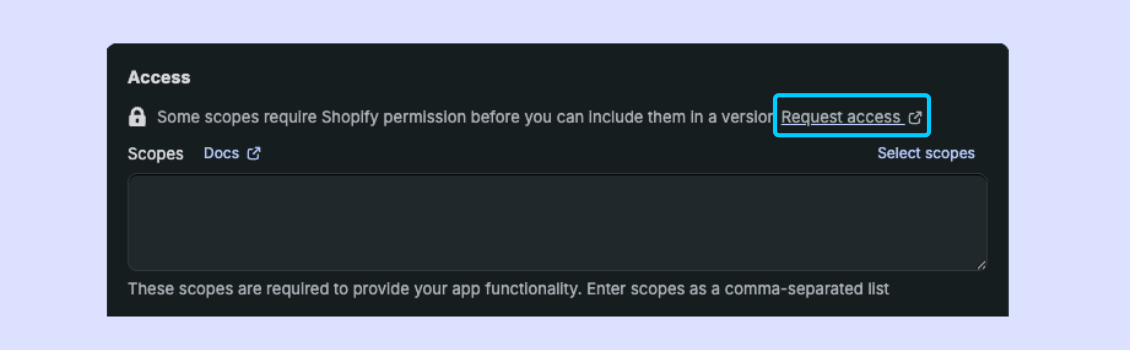
- Select Release. In the pop-up window, select Release again. Your Clever AI connector app is now ready.
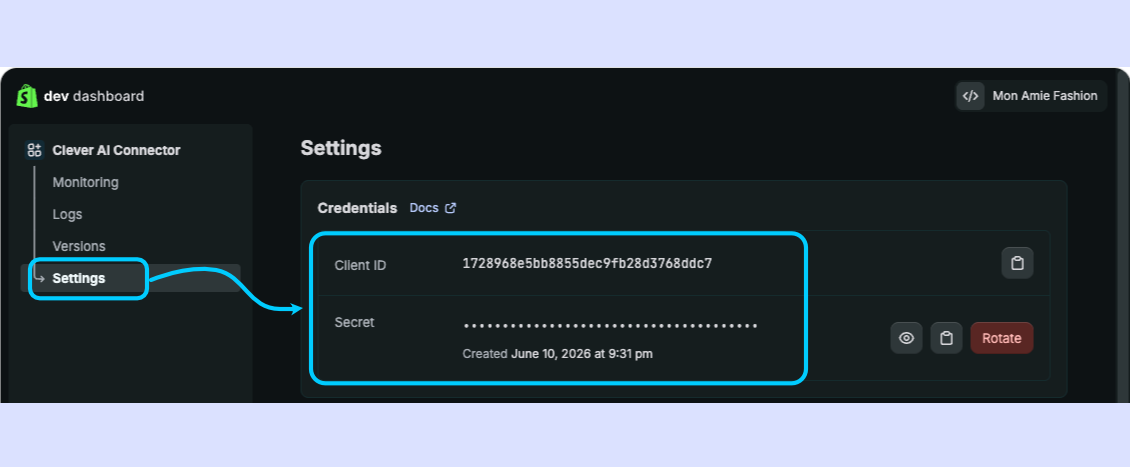
- Go to the Settings panel and under the Credentials section, copy and save the Client ID and Secret of your app for use in Part 3 of this setup.
Part 2 - Install custom connector app to your store.
- From the Dev dashboard, select the new custom connector app.
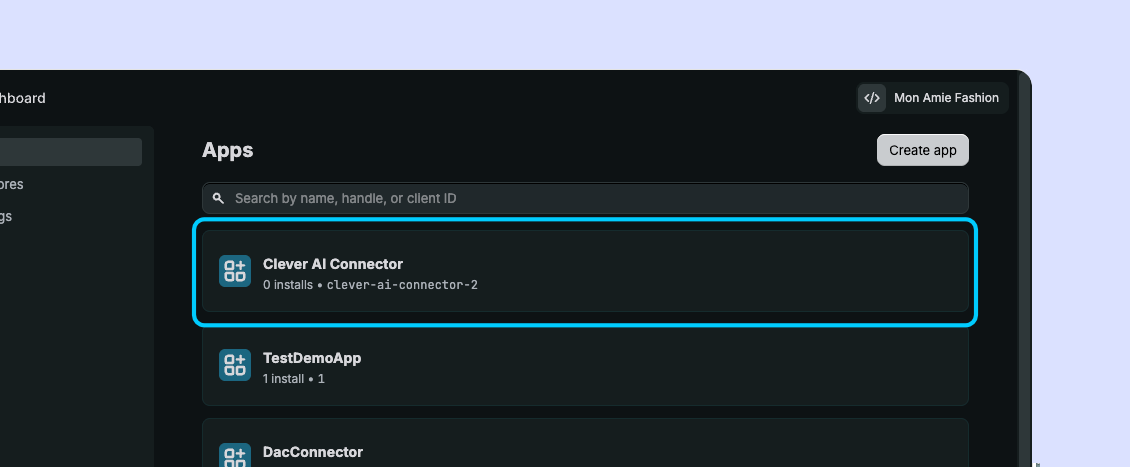
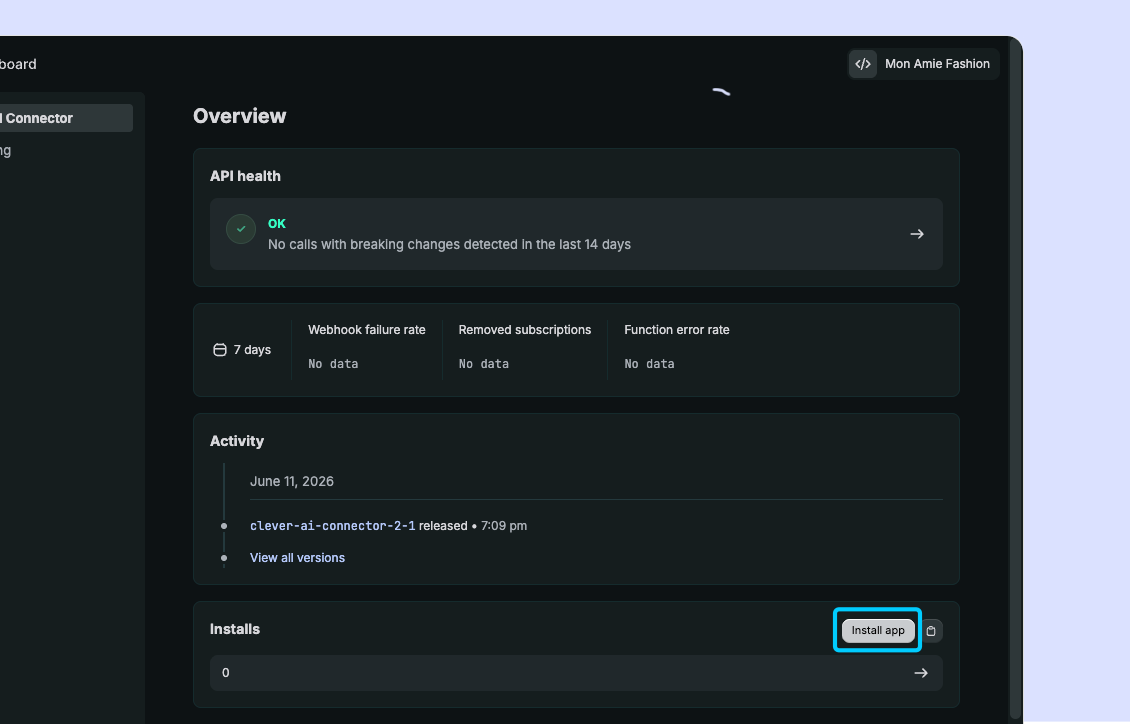
- Scroll down to the Installs section and select Install app. This will open a window where you can select the store to install the connector in.
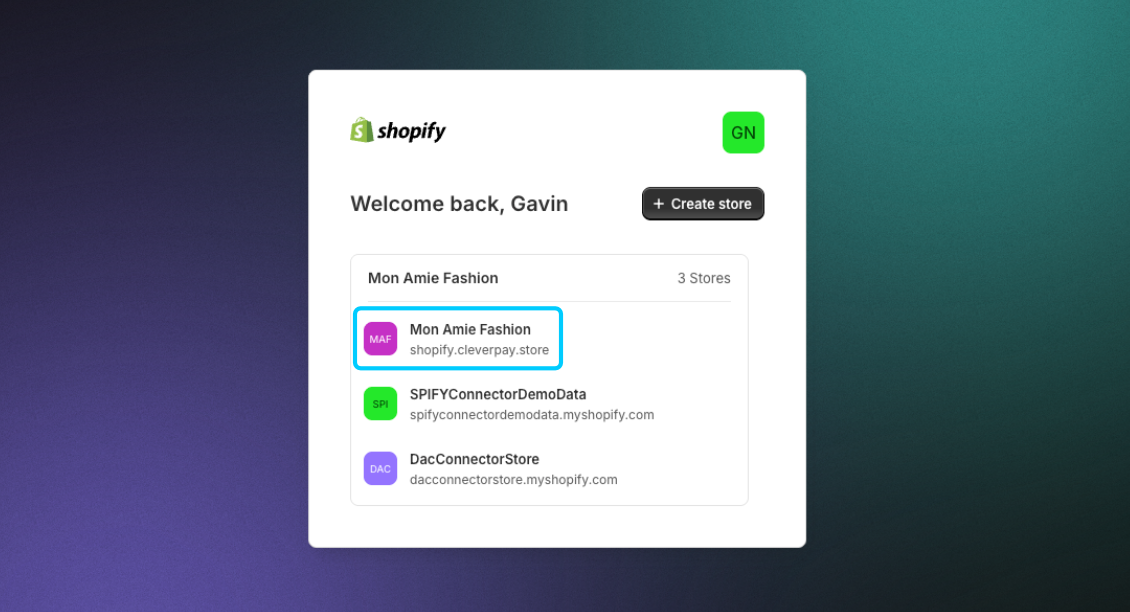
- Select your store.
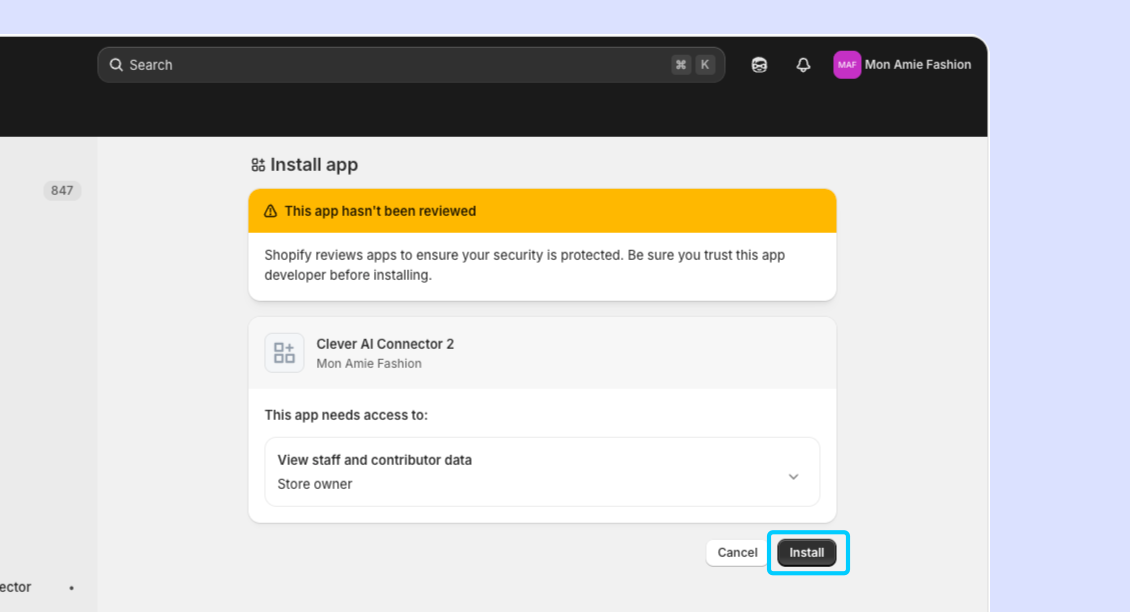
- In the Install app panel, select Install.
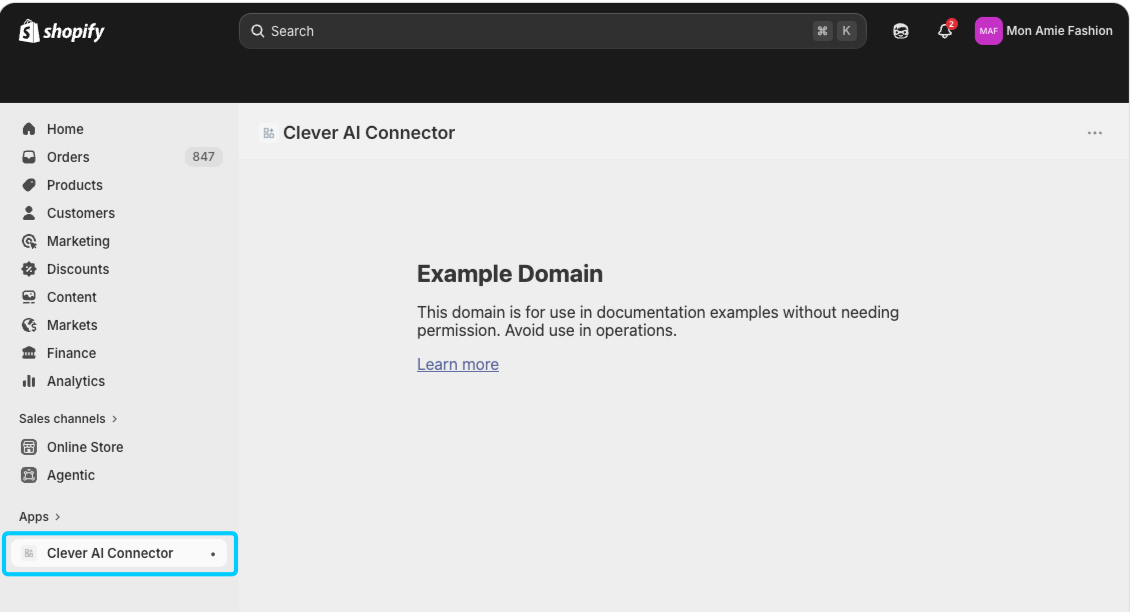
- Once installed, your connector app will now be listed under Apps in the left-hand navigation menu of your Shopify dashboard.
 You can now add and use the custom connector app to Clever AI.
Part 3 - Add the custom connector app in Clever AI.
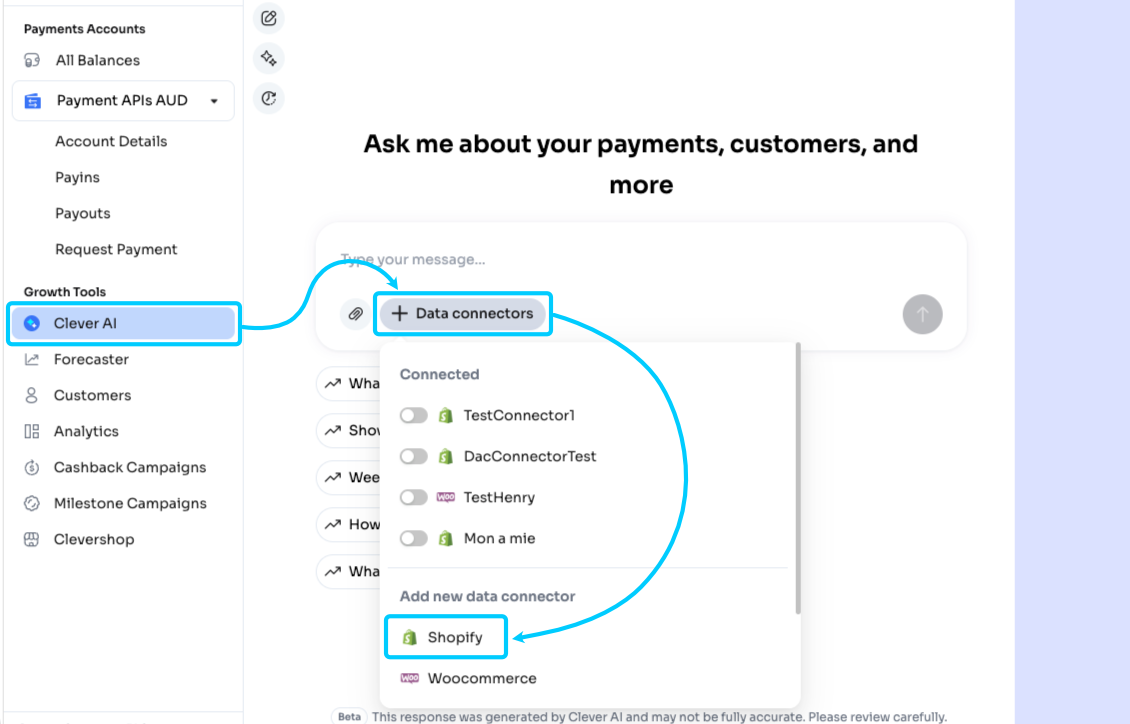
After setting up your custom connector app in Shopify, you need to do the following:- Log in to your Hello Clever merchant account and navigate to the Clever AI hub.
- In the prompt box, select + Data connectors. From the pop-up options, select Shopify under Add new data connector.
- In the setup form, enter the following details:
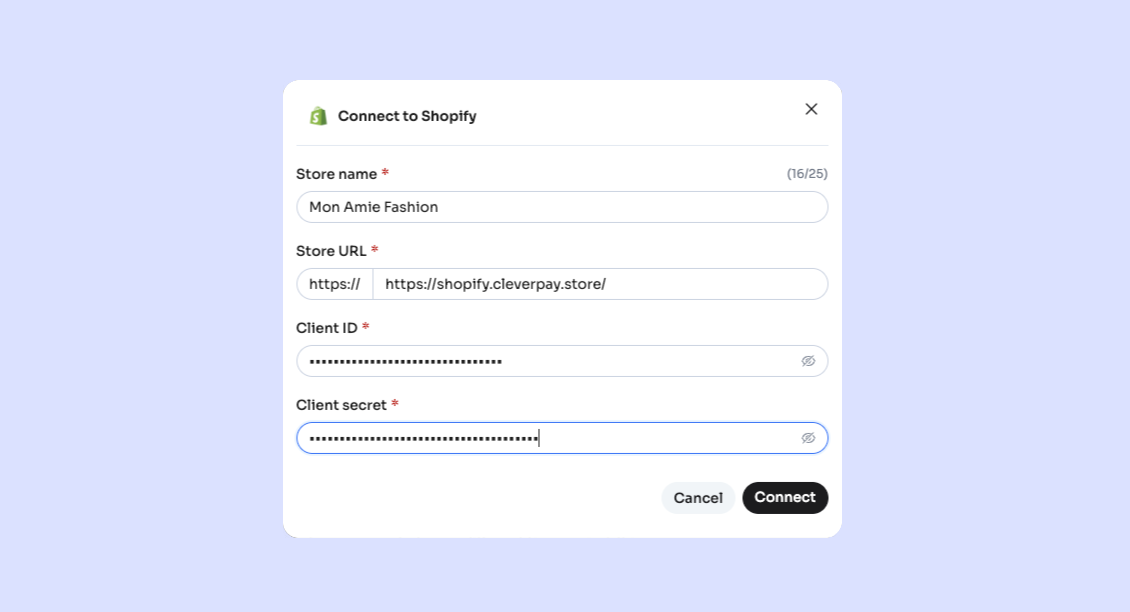
Retrieving your Shopify store URLTo retrieve the correct Shopify Store URL for use in the setup:
- Check the URL of your Shopify Admin dashboard in your browser. It will be something similar to
https://admin.shopify.com/store/YOUR-STOREwhereYOUR-STOREis your store identifier. - Append
.myshopify.comto your store identifier, for exampleYOUR-STORE.myshopify.com. This will be your Shopify Store URL.
- Select Connect. The new custom connector app will now be connected to Clever AI.
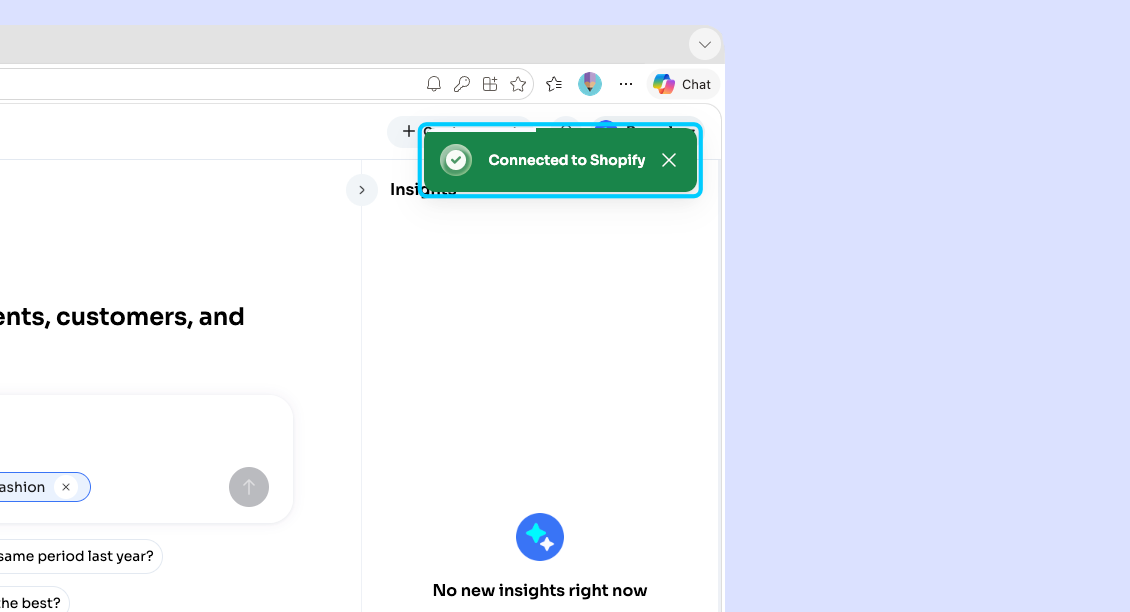 Clever AI will begin synching your store data. This process can take up to 24 hours.
Part 4 - Start using Clever AI to query your store data.
Once your Shopify store has been connected to Clever AI, you can now ask questions specific to your store information (within the scopes allowed).- In the prompt box, select + Data connectors.
- From the pop-up menu, toggle on your store’s name.
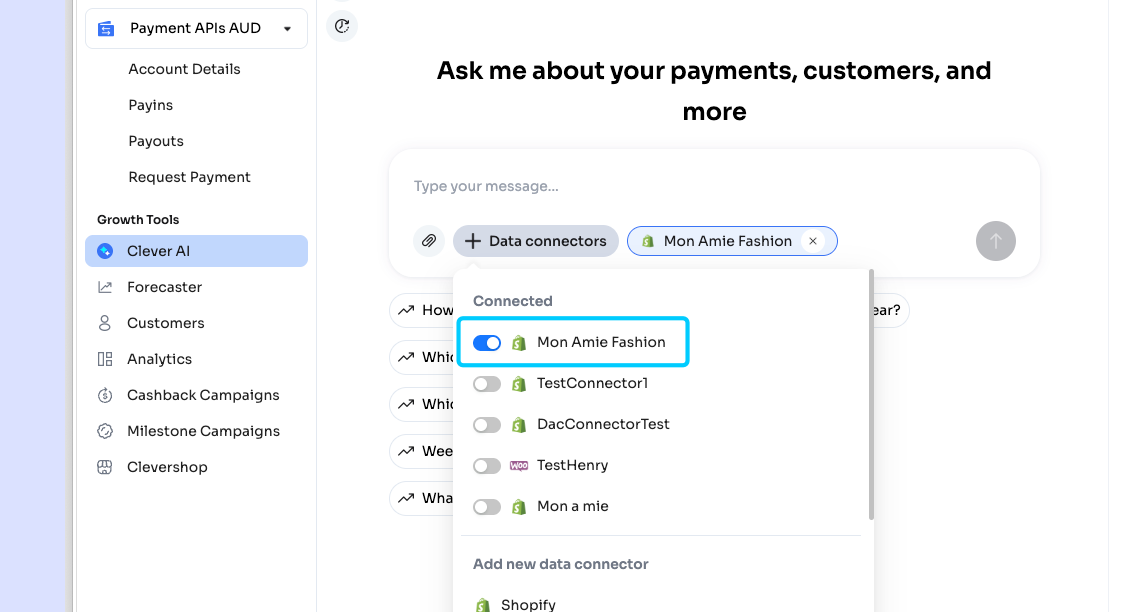
- Start asking questions. Clever AI will now query your store’s data when answering.
Glossary
Troubleshooting
Duplicate Store Domain Error
Each store domain is treated as a unique identifier in the Clever AI system. If you see an error about a duplicate store domain, it means that store has already been registered. To resolve this:- Check whether the connector has already been set up by another team member.
- If you need to re-connect, remove the existing connector entry before adding a new one.
- Make sure you are entering the Store Domain and not the Store Name; these are different fields.
Store Domain vs. Store Name
Chatbot Cannot Answer My Question
If Clever AI responds that it does not have enough information, the most likely cause is a missing data scope.- Return to your Shopify app settings and review which scopes are enabled.
- Add the relevant read scope and reinstall the app to update the credentials.
- Note that it may take up to 24 hours for the newly scoped data to become available.
Data Has Not Synced After 24 Hours
If your store data still has not appeared in Clever AI after 24 hours:- Verify that all credentials were entered correctly (no extra spaces or missing characters).
- Check that the app was fully installed in Shopify (Part 1, Step 9).
- Contact Hello Clever support for assistance.
Security & Data Privacy
Hello Clever takes data security seriously. The following principles govern how Clever AI handles your Shopify data.- Clever AI only requests read access. It will never write to, modify, or delete data in your Shopify store.
- Access is strictly limited to the scopes you select. No additional data is retrieved beyond what you have explicitly approved.
- Your API credentials are stored securely within the Hello Clever platform and are not shared with third parties.
- Sensitive financial information such as bank account numbers, passwords, and personal identity data fall outside the supported scopes and are never accessible.
Need Help?
If you encounter an issue not covered in this guide, please reach out to the Hello Clever support team.- Contact Hello Clever support through your merchant dashboard.
- Have your Store Domain and Connection Name ready when contacting support.
- For urgent issues, include details of any error messages you received.